

In order to ensure fresh, clean water it’s recommended that you change your refrigerator water filter every 6 months. But this is easier said than done when you don’t know where the filter is or how to change it. We’ll review how to change water filter in LG refrigerator, where to find it, and how to troubleshoot if a filter gets stuck.
Wondering How to Change Water Filter in LG Refrigerator? Follow These Simple Steps
Even if you change water filter in LG refrigerator every 6 months certain problems may require more frequent changes. If your ice tastes bad or ice and water production is limited, additional changes may be necessary. These simple steps for how to replace LG refrigerator water filter can help maintain high-quality ice and drinking water.
How to Replace LG Side-by-Side Refrigerator Water Filter
Model #s: LT1000P, LT800P, LT700P
The LG refrigerator water filter location for side-by-side refrigerators is most commonly in the top left corner of the refrigerator’s interior. Here’s how to change water filter in LG side-by-side refrigerator:
- Remove the top shelf by tilting up and pulling straight out.
- Press the “Push” button on the filter compartment and pull down to lower the compartment door.
- Pull the old water filter downward and remove it by gently pulling towards you.
- Remove plastic wrapper from the new filter.
- Line up the tabs on the filter’s side with the compartment and push the filter in gently. Once the filter is secure, lift the filter all the way up.
- Lift the filter door and push until it clicks in place.
- Replace refrigerator shelf.
- Dispense and dispose of 2.5 gallons of water in 30-second intervals to remove any trapped air or contaminants.
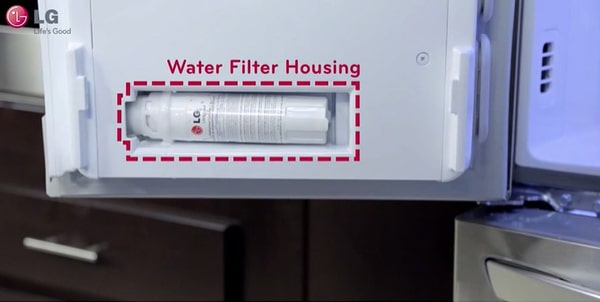
Photo Credit: LG
How to Replace LG French Door Refrigerator Water Filter
Model #s: LT600P, LT500P
The water filter on most French door refrigerators is located on the left interior door. Follow these steps to change water filter in LG French door refrigerator:
- Turn off the water valve that supplies the refrigerator water line.
- Dispense any remaining water.
- Open the left refrigerator door and remove the bottom door bin by lifting up and out from both ends.
- Gently swing out the old filter and, grasping the bottom, turn counterclockwise until the filter is released.
- Unwrap new filter and remove top cap.
- Place the top of the filter in the compartment’s filter mount and turn clockwise until the filter locks in place.
- Push the bottom of the filter into the filter compartment.
- Replace the door bin by sliding it downward and pushing until it’s securely in place.
- Turn on the water valve.
- Dispense and dispose of 2.5 gallons of water in 30-second intervals to prime the new filter.
How to Reset LG Water Filter Light
Some refrigerators have a water filter indicator light near the dispenser that signals when to change water filter in LG refrigerator. After changing the filter, reset the water filter light on the LG refrigerator by holding the “Reset” or “Filter” button down for 5 seconds. The light should turn off until the filter needs to be changed again.
What to Do When Your LG Water Filter is Stuck
Sometimes it can be difficult to remove the old water filter from its compartment. These troubleshooting tips can help when your LG water filter won’t come out:
- Always remove the top shelf if your water filter is located in the top corner of the refrigerator’s interior. This provides more space when pulling the filter downward, allowing for easier removal.
- Lingering water pressure in the refrigerator’s water line can make the filter difficult to remove. After turning the water line off, always dispense of any remaining water to decrease pressure before removing the old filter.
- If your filter is still stuck, a professional service may be required to help change water filter in LG refrigerators.
For the best in LG refrigerator repair Minneapolis, call D&T Appliance Service for a fast and expert repair!